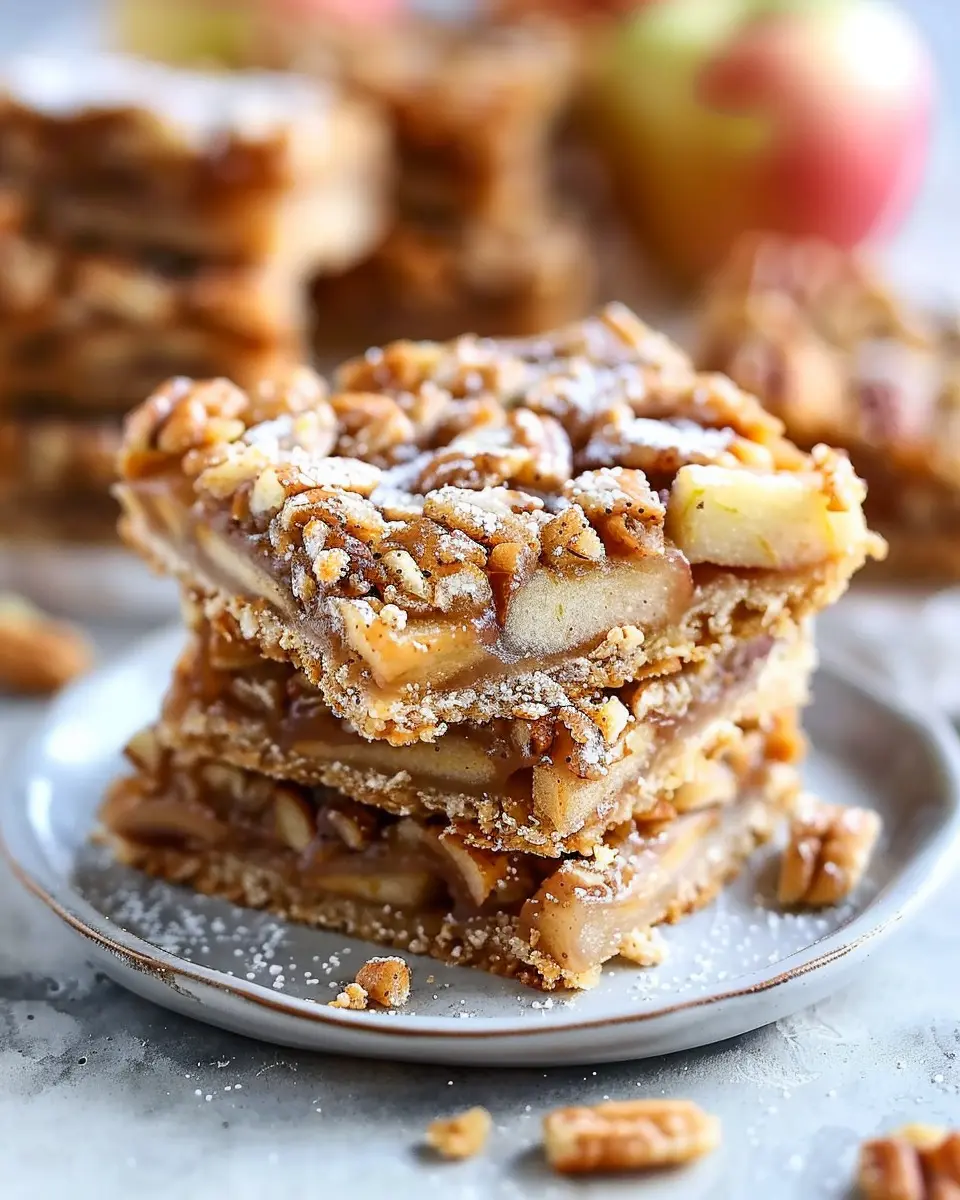
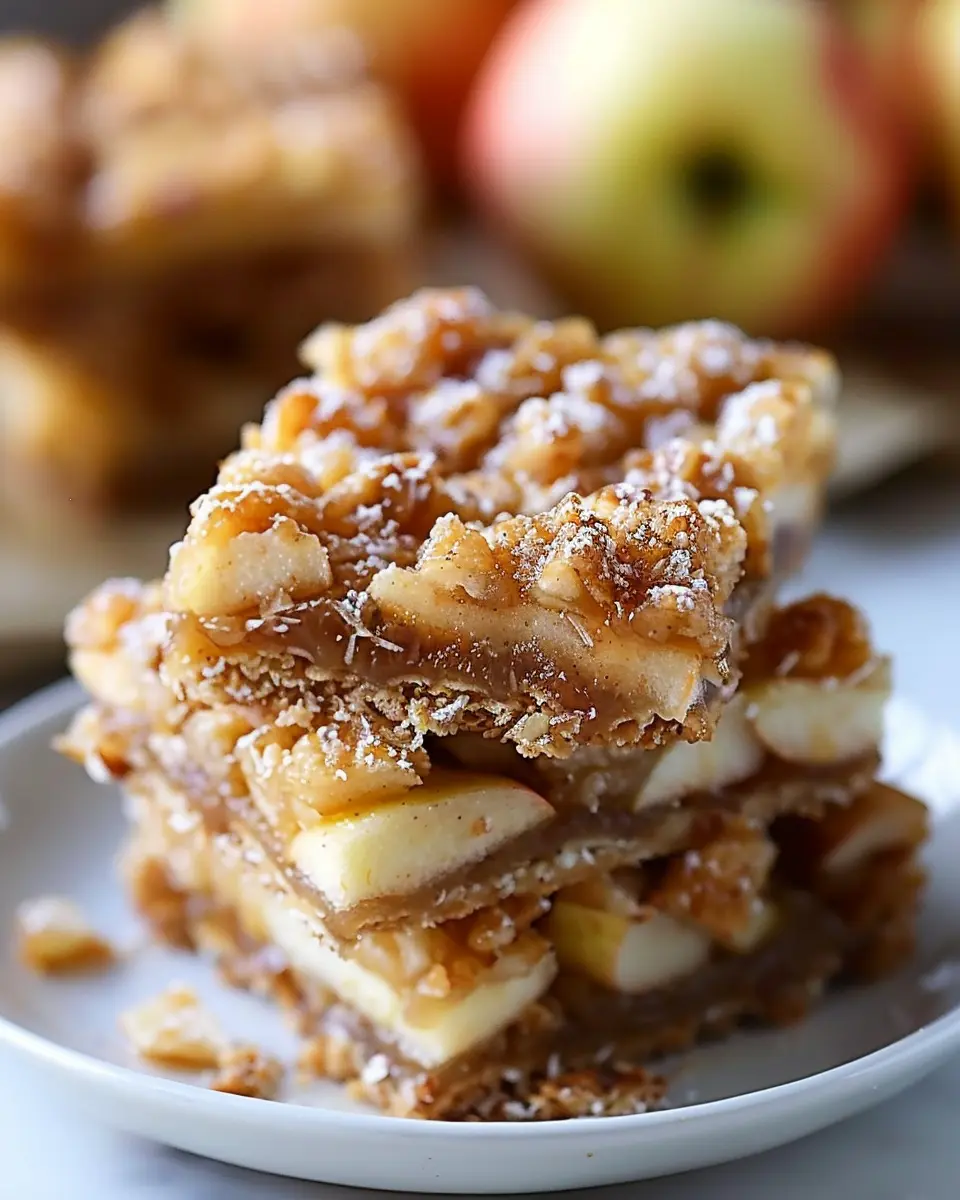
Introduction to Apple Bars
Why Apple Bars?
If you’re searching for a delightful dessert that brings a warm and cozy feeling to any gathering, look no further than apple bars. These treats are more than just a dessert; they’re a celebration of the versatile apple, a fruit admired for its crispness and sweetness.
Apple bars combine the best of both worlds—texture and flavor. The tender base, often made with flour, butter, and sugar, sets the stage for the star of the show: the flavorful apple filling. Whether you opt for Granny Smiths for a tart punch or Honeycrisps for a hint of sweetness, your choice of apples can elevate this recipe to new heights.
What makes apple bars particularly enticing is their adaptability; they can be enjoyed warm and fresh from the oven or cooled for a refreshing afternoon snack. Perfect with a scoop of ice cream or a dollop of whipped cream, they also make an excellent companion to a steaming cup of coffee or tea—ideal for your afternoon break or a casual gathering with friends.
But why do these bars hold such a special place in our hearts? Maybe it’s the nostalgia of baking with family or the simple pleasure of sharing a homemade treat. According to a study by the American Psychological Association, baking at home can reduce stress and increase feelings of well-being. Perhaps it’s that aromatic scent of apples and cinnamon filling your home that just makes everything feel right.
Not to mention, apple bars are perfect for any occasion, whether it’s a cozy fall gathering, a potluck, or just a treat for yourself after a long day. They are versatile enough to be a delightful finish to a festive holiday meal or a simple midweek pick-me-up.
So, if you’re ready to create something delicious and baking-fueled love, dive into our apple bars recipe and bring the warmth of apples into your kitchen today. You’ll find that these bars are as rewarding to make as they are to devour. Let’s get baking!
Ingredients for Apple Bars
When it comes to whipping up delicious apple bars, having the right ingredients makes all the difference. Here’s what you’ll need for a perfect batch of sweet, cinnamon-kissed goodness:
Fresh Apples
- About 3 cups of peeled, chopped apples (Granny Smith or Honeycrisp work wonderfully)
Base and Crust
- 1 ¾ cups of all-purpose flour
- 1 cup of brown sugar
- ½ cup of unsalted butter, softened
- 1 tsp of baking powder
- ½ tsp of salt
Spices and Flavor
- 1 tsp of cinnamon
- ½ tsp of nutmeg (optional for an extra spice kick)
- 1 tsp of vanilla extract
Topping
- ½ cup of oats (adds a great textural contrast)
- ¼ cup of chopped nuts (walnuts or pecans for some crunch)
Optional Add-ins
- Raisins or cranberries (for a burst of flavor and nutritional boost)
These simple yet essential ingredients come together to create delightful apple bars that are perfect for a quick snack or an indulgent dessert. Curious about how these ingredients blend? You might want to check out more about the nutritional benefits of apples here.
Get ready to enjoy the delicious aroma and taste that fills your kitchen!
Step-by-Step Preparation of Apple Bars
Making apple bars from scratch is not only a fun activity but also a fantastic way to impress friends and family. These delicious treats are perfect for gatherings, casual snacks, or even a cozy night at home. Let’s dive into the preparation process together!
Preheat and Prepare the Pan
Start by preheating your oven to 350°F (175°C). This step is crucial because a hot oven ensures even baking of your apple bars. While the oven heats up, grab a 9×13-inch baking dish. You’ll want to grease it lightly with butter or line it with parchment paper for easy removal later. Check out these baking tips for more useful insights!
Mix the Crust Ingredients
Now it’s time to whip up the crust that will cradle your apple filling. In a medium-sized bowl, combine the following ingredients:
- 2 cups all-purpose flour
- 1 cup granulated sugar
- 1/2 cup unsalted butter, melted
- 1 large egg
- 1 tsp vanilla extract
- 1/2 tsp salt
- 1/2 tsp baking powder
Use a wooden spoon or an electric mixer on low to blend everything until the mixture resembles a crumbly dough. The vanilla and butter will create a wonderfully rich base that enhances the overall flavor of your apple bars.
Press the Crust into the Pan
Once your crust mixture is ready, gently press half of it into the bottom of your prepared pan. Ensure it’s evenly spread to create a solid foundation. Feel free to moisten your hands while pressing, as this can help reduce stickiness. The goal is a smooth, compact layer that will hold the delicious apple filling beautifully.
Prepare the Apple Filling
With the crust firmly in place, it’s time to prepare the filling. For this, you’ll need:
- 4 large apples, peeled, cored, and sliced (Granny Smith or Honeycrisp apples work wonders)
- 1 cup granulated sugar
- 1 tsp cinnamon
- 1 tbsp lemon juice (to prevent browning)
- 2 tbsp cornstarch (to thicken the filling)
In a large bowl, mix the apple slices with sugar, cinnamon, lemon juice, and cornstarch. The cinnamon adds a warming element, while the lemon juice enhances the apples’ natural flavors, creating a delightful contrast.
Layer the Apple Filling
Now, it’s time to layer that savory apple filling onto the crust. Carefully arrange the seasoned apple mixture on top of your crust, spreading it out evenly. Crumble the remaining crust mixture over the apple filling, creating a topping that will become beautifully golden as it bakes.
Bake and Cool the Bars
Place your pan in the preheated oven and bake for about 35 to 40 minutes, or until the top is golden brown and the apple filling is bubbling. Your kitchen will fill with an irresistible aroma that will have everyone eagerly awaiting a taste. Once baked, remove the pan from the oven and allow it to cool completely before cutting into squares.
This cooling time is essential—not only does it help solidify the bars, but it also allows the flavors to meld perfectly. You can even refrigerate them to serve cold if you prefer!
Enjoying freshly made apple bars in your own home can bring a sense of comfort and nostalgia. The combination of the buttery crust and sweet, spiced apple filling is genuinely irresistible. So, go ahead, gather your friends or family, and share these delightful treats!
Ready to get baking? Equip yourself with your favorite apple varieties and make some memorable apple bars today. You won’t regret it!
Variations on Apple Bars
When it comes to apple bars, there’s no shortage of delicious variations to explore. Whether you’re hosting a gathering or simply indulging yourself, these twists on the classic recipe can elevate your dessert game.
Apple Nut Bars
For those who crave a bit of crunch, apple nut bars are an irresistible alternative. By adding a blend of chopped walnuts or pecans, you’ll introduce a lovely texture and depth of flavor to your bars. The nuts pair wonderfully with the sweetness of the apples and can even enhance the nutritional value.
- To make them, simply incorporate your nuts into the apple filling.
- A sprinkle of cinnamon and a dash of nutmeg can bring out the flavors even further.
- For an extra indulgence, consider drizzling some honey or maple syrup on top before baking.
You can find more tips on incorporating nuts into desserts at Healthline.
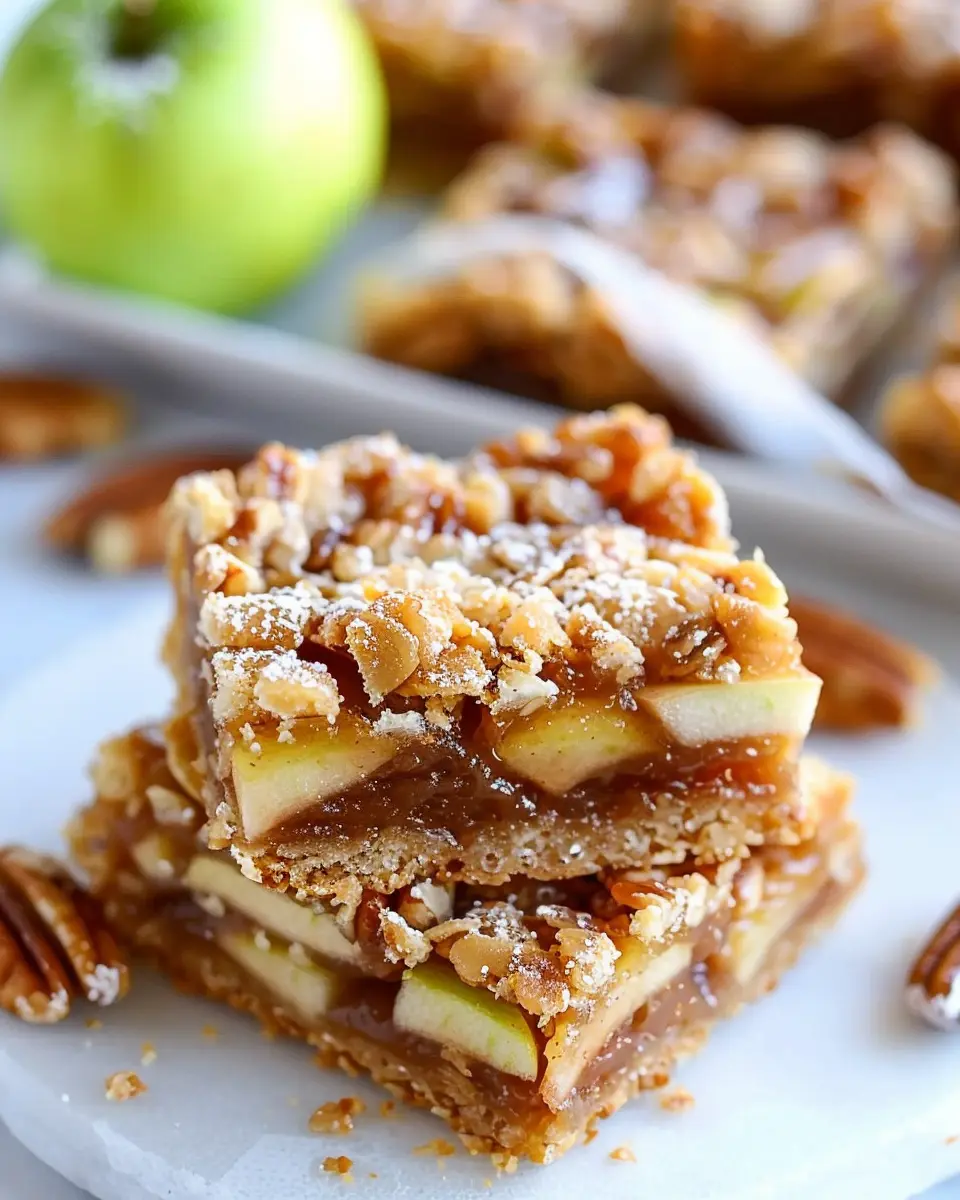
Caramel Apple Bars
If you have a sweet tooth, caramel apple bars will surely hit the spot. Imagine the rich decadence of gooey caramel swirling with tart apples—it’s pure heaven!
- To create this version, melt some caramel candies and mix them into your apple filling.
- You can also top your bars with a layer of caramel sauce for a beautiful presentation.
- For those looking to add a hint of savory, a sprinkle of coarse sea salt can beautifully complement the sweetness.
For inspiration, check out this fantastic recipe for caramel apple desserts at Food Network.
With these variations, your apple bars will never get old! Whether you prefer the nutty crunch or the rich sweetness of caramel, there’s a version for every palate. What will you choose to try first?
Baking Notes for Apple Bars
When whipping up apple bars, let’s ensure everything is just right for that comforting, home-baked goodness. Here are some tips to keep in mind:
Choosing the Right Apples
The key to delicious apple bars lies in choosing the right apples. Varieties like Granny Smith or Honeycrisp are perfect for baking because they hold up well and offer a nice balance of sweet and tart flavors. For a unique twist, consider mixing different kinds!
Don’t Skip the Brown Sugar
Using brown sugar instead of regular sugar can enhance the flavor profile of your apple bars. It adds a deeper, warmer sweetness that really complements the apples. Want to learn more about sugar options? Check out sources like Healthline.
Perfect Timing
Baking time is crucial. If the bars look golden but the center seems too soft, let them cool completely before cutting. They tend to firm up as they set. You wouldn’t want to miss out on those perfectly cut bars!
Experimenting with Spices
For those who love a little kick, don’t hesitate to add spices like cinnamon, nutmeg, or even a pinch of cardamom. These spices elevate the flavor and create that warm, inviting aroma we associate with baking.
By keeping these baking notes in mind, your apple bars will undoubtedly impress your family and friends!
Serving Suggestions for Apple Bars
When it comes to serving apple bars, you want to elevate their deliciousness and charm. Here are some tasty options to consider:
-
With Ice Cream: A warm apple bar paired with a scoop of vanilla ice cream is a classic combination. The melting ice cream contrasts beautifully with the gooey apple filling.
-
Drizzle with Caramel Sauce: Adding a touch of caramel sauce can enhance the flavors, making each bite even more indulgent.
-
Dusting of Powdered Sugar: For a simple yet elegant touch, sprinkle some powdered sugar on top. It gives a lovely presentation, perfect for tea parties or casual get-togethers.
-
Serve with Whipped Cream: Light, airy whipped cream adds a delightful creaminess, making every mouthful heavenly.
If you’re looking for a beverage pairing, consider a refreshing cup of herbal tea or a rich cup of coffee to complement the warm spices of the apple bars.
For more ideas on how to enjoy these delicious treats, check out resources from the Food Network or Taste of Home to inspire your dessert table!
Tips for Making Perfect Apple Bars
When it comes to crafting delightful apple bars, a few key tips can transform your baking from good to absolutely divine. Whether you are a kitchen novice or a seasoned pro, these handy suggestions will help you master the art of making these delicious treats.
Choose the Right Apples
Start by selecting the best apples for your apple bars. Varieties like Granny Smith or Honeycrisp bring a delicious balance of tartness and sweetness. The texture is also crucial; firmer apples hold up better during baking, providing that perfect bite.
Quality Counts
Using fresh, high-quality ingredients makes a significant difference. Opt for unsalted butter for the crust; it provides a rich flavor that complements the sweetness of the apples.
Don’t Skimp on Spices
Cinnamon is a must, but don’t be afraid to spice things up with nutmeg or allspice for an extra layer of flavor. These warm spices not only enhance the taste but also create an inviting aroma that fills your kitchen.
Perfect the Crust
For a buttery, flaky crust, avoid over-mixing the dough. Use cold butter and work it into the flour until it resembles coarse crumbs. This step is crucial for that desired texture.
Consider checking out this guide on baking techniques to further refine your skills.
Allow to Cool
Patience is key! Let your apple bars cool completely. This will help them set and make slicing much easier, resulting in picture-perfect pieces.
Follow these tips, and you’ll be sharing your delicious apple bars with friends and family in no time!
Time Breakdown for Apple Bars
Planning your time effectively is key to creating delicious apple bars. Here’s the breakdown to help you stay organized and stress-free in the kitchen!
Preparation Time
Getting your ingredients ready will take about 20 minutes. This includes peeling and slicing your apples, measuring out your dry ingredients, and mixing your wet ingredients. Having everything in place will make the baking process much smoother!
Baking Time
The baking itself requires around 30-35 minutes. You’ll want to keep an eye on the bars, ensuring they turn a lovely golden brown. The tantalizing smell wafting through your kitchen will have everyone eager to dive in!
Total Time
In total, expect to spend around 55-60 minutes from start to finish. In no time, you’ll have scrumptious apple bars that are perfect for any occasion—or just for a delightful treat at home!
For more on the delightful apple varieties to choose from, check out this comprehensive guide on apples.
Nutritional Facts for Apple Bars
When you’re enjoying your homemade apple bars, it’s good to know what you’re indulging in. Let’s break down some essential nutritional facts that make these treats both delicious and satisfying.
Calories
Each serving of apple bars typically contains around 150-200 calories, depending on the recipe. This makes them a reasonable choice if you’re looking for a sweet snack without going overboard.
Fiber
Apple bars can be a decent source of fiber, often offering about 2-3 grams per serving. Fiber is vital for digestion and can help keep you feeling full longer, making these bars a smart option for busy professionals.
Sugar
Although your apple bars may contain natural sugars from apples and added sweeteners, aiming for a total sugar count of about 8-10 grams per serving is common. This ensures you satisfy your sweet tooth without excessive sugar consumption.
For further information on nutrition and healthy eating, check out resources like Healthline and MyPlate. Prioritizing nutritional awareness alongside indulgence can enrich your diet while still enjoying all the flavors life has to offer.
FAQs about Apple Bars
Can I use different types of apples for this recipe?
Absolutely! One of the beautiful aspects of making apple bars is the versatility in the type of apples you can use. While Granny Smith apples offer a tart flavor that contrasts wonderfully with sweetness, Fuji and Honeycrisp apples add a delightful crunch and sweetness. You can even mix different varieties to create a more complex flavor profile. As a handy tip, check out this guide from The Kitchn for more apple recommendations!
How do I store leftovers?
Storing your apple bars is simple! Once they’ve cooled to room temperature, cover them tightly with plastic wrap or transfer them to an airtight container. They can be stored at room temperature for about 2 days. For longer storage, consider placing them in the fridge, where they’ll stay fresh for up to a week. If you want to keep them even longer, feel free to freeze them. Just make sure to wrap them individually in plastic wrap before freezing, and they’ll last up to 3 months.
Can I make these apple bars ahead of time?
Yes, you can! Making your apple bars ahead of time is a great idea, especially if you’re planning for a busy week or a special occasion. They typically taste even better after they’ve had time for the flavors to meld. You can bake them a day in advance, store them in the fridge, and then simply warm them up before serving. Keep in mind that they can also be made and frozen; just be sure to let them cool completely before wrapping them up for the freezer. This way, you’ll always have a delicious treat ready at a moment’s notice!
Conclusion on Apple Bars
In closing, apple bars are a delightful treat that can easily elevate your dessert game. Whether you’re enjoying them as an afternoon snack or serving them at a gathering, these bars offer the perfect balance of sweetness and tartness. Baking them is not only straightforward, but it also fills your kitchen with a warm, inviting aroma.
Don’t hesitate to experiment with your favorite toppings, like a dollop of whipped cream or a sprinkle of cinnamon. Interested in more sweet ideas? Check out resources from the National Apple Association to dive deeper into using apples in your cooking. In the end, creating these bars is not just about the end product but the joyful experience of baking!
PrintApple Bars: The Easy Indulgence You Need in Your Dessert Rotation
A delightful recipe for apple bars that everyone will love!
- Prep Time: 15 minutes
- Cook Time: 35 minutes
- Total Time: 50 minutes
- Yield: 12 bars
- Category: Dessert
- Method: Baking
- Cuisine: American
- Diet: Vegetarian
Ingredients
- 3 cups diced apples
- 1 cup sugar
- 2 cups flour
- 1 teaspoon baking powder
- 1/2 teaspoon cinnamon
- 1/4 teaspoon salt
- 1 cup butter, melted
- 2 eggs
Instructions
- Preheat the oven to 350°F.
- In a large bowl, mix the diced apples with sugar.
- In another bowl, combine flour, baking powder, cinnamon, and salt.
- Add the dry ingredients to the apple mixture.
- Stir in the melted butter and eggs until well combined.
- Pour the mixture into a greased baking dish.
- Bake for 30-35 minutes or until golden brown.
- Let cool before cutting into bars.
Notes
- For extra flavor, add walnuts or raisins to the mixture.
- Serve with a scoop of vanilla ice cream for a delightful dessert.
Nutrition
- Serving Size: 1 bar
- Calories: 180
- Sugar: 12g
- Sodium: 150mg
- Fat: 7g
- Saturated Fat: 4g
- Unsaturated Fat: 2g
- Trans Fat: 0g
- Carbohydrates: 25g
- Fiber: 2g
- Protein: 2g
- Cholesterol: 40mg